
Don’t take up valuable storage space if you don’t have to.
The cameras on our phones get better every year, which results in higher-quality photos and videos that take up more space on our devices and in the cloud, where you typically have to pay extra for backup storage.
A good example is the iPhone 14 Pro’s 48-MP camera, which can shoot images that are 75 MB in size in uncompressed ProRAW mode (about three times the size of an image taken by the 12-MP camera on the iPhone 13 Pro). This quickly mounts up storage if you take a lot of pictures, as most people do.
The same appears to be true with video. For instance, the Samsung Galaxy S22 can capture 8K video at 24 frames per second, which will take up about 600 MB of storage space each minute you’re recording. There is a cost in terms of storage if you want the highest resolutions and quality.
Buying phones with additional internal storage is pricey—to return to the iPhone 14 Pro, there is a $500 price difference between the 128 GB model and the 1 TB model and it’s a feature that many buyers will choose to forego. Free space becomes an issue as the photos and videos mount, especially for upcoming software updates and programs you might wish to use.
You can lower the quality settings for your photos and videos to prevent quickly exhausting your local storage or paying outrageous prices for cloud storage, or even both. Nevertheless, you should think about how amazing your photos and videos actually need to be, whether you’re sharing them with family, posting them on social media, or just saving them for yourself. This is how:
IOS

If you’re using an iPhone, enter the Settings screen, hit Camera, then Formats to view the camera quality settings. If you wish to keep file sizes as little as possible, choose High Efficiency rather than Most Compatible. This will use Apple’s preferred, optimized HEIF/HEVC formats rather than the more common JPEG/H.264 ones, and the selection includes both video and photos.
Depending on the iPhone model you’re using, you might notice toggle switches for Apple ProRAW (for pictures) and Apple ProRes (for videos), as well as resolution choices, underneath. Keep in mind that these toggle switches just affect whether these modes are available as buttons in the Camera app; to truly enable or disable them, you must do so from the shutter screen after starting the camera.
You’ll find more options for the resolution and frame rate your iPhone uses to record videos when you return to the Camera preferences screen: To make changes, press Record Video. Depending on the type of iPhone you have, there will be a different list of formats; nonetheless, the ones with the smallest storage requirements will be mentioned first.
Regarding saving space on your iPhone, there is one additional solution worth considering. Tap Photos in Settings, followed by iPhone Storage Optimization: In order to preserve space on your device when your photos and videos are being backed up to iCloud, iOS will save lower resolution versions of your media locally (with full resolution copies still available in iCloud).
Andriod
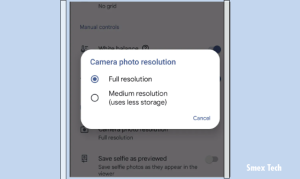
Finding the camera settings for your Android device shouldn’t be too difficult, however the specifications do differ slightly between Android device manufacturers. Open the camera in Camera mode on any Android device, such as a Google Pixel phone, and hit the cog symbol (top left if you’re in portrait orientation): After that, you may choose between Camera photo resolution and More settings.
Tap the cog once again to switch from camera to video, and an overlay with the possible resolutions and frame rates will show above the camera viewfinder. Depending on the make and model of your phone, your options will change, but the smaller the resolution and the lower the frames per second rate, the smaller the generated file sizes will be.
When using the default camera app on a Samsung phone and the Photo mode is turned on, you can see your selections by tapping the icon in portrait mode, third from the right, at the top of the screen. To adjust the resolution and file size, swipe over to video mode and hit the icon in the upper right corner that is second from the left.
If you need to quickly clear out some storage space on your local device, Google Photos has a way of doing this: From inside the app, tap your profile picture (top right), then choose Free up space and confirm the action. The app will delete any photos and videos that are safely backed up to cloud storage, and tell you how much space you just freed up at the same time.


